Deleted
Deleted Member
Posts: 0
|
Post by Deleted on Jan 18, 2021 14:05:18 GMT -5
Welded and concreted the frame to hold up the 800Kg of batteries.  Hope 3mm channel can suppport each weight, carrying 100K per 900mm between the posts, each post carries 100Kg roughly. Shalom |
|
Deleted
Deleted Member
Posts: 0
|
Post by Deleted on Jan 25, 2021 22:07:00 GMT -5
Let's see where we are?  Some forums swear by the use of Vaseline on battery posts. So I did a test myself. 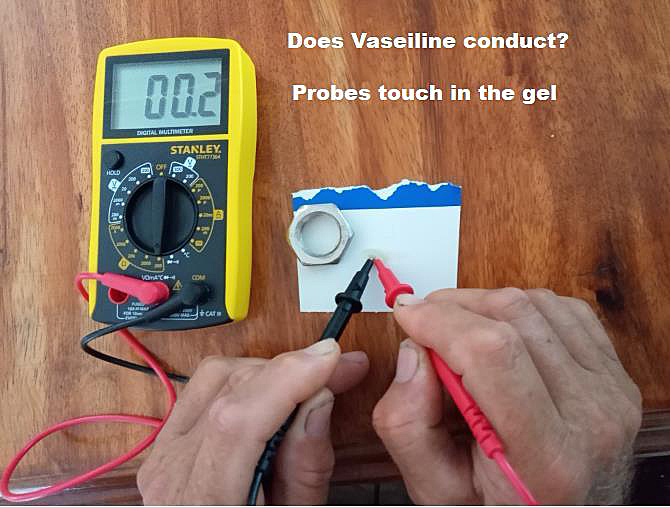 As you can see Vaseline does NOT conduct electrical currents. Collects dust, corrosion, etc . Does not really help with reducing corrosion I feel. Do your maintenance on your batteries, and the problems will go away. Shalom |
|
Deleted
Deleted Member
Posts: 0
|
Post by Deleted on Jan 25, 2021 22:37:30 GMT -5
My battery bank hooked up nearly and ready to go  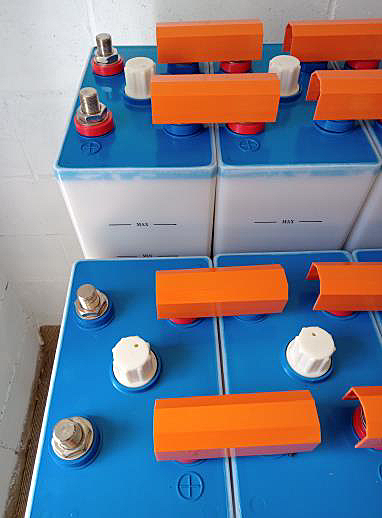 Hard to confirm this is hook up correctly? This is the middle end. 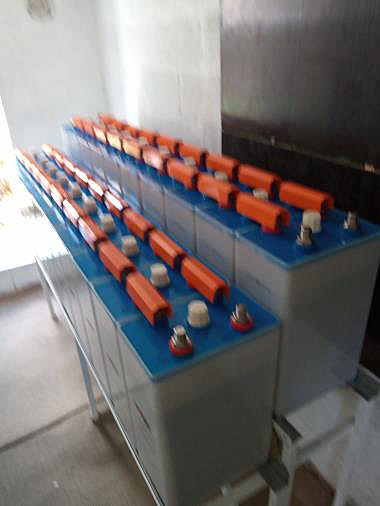 This view is the battery 24V DC end. Yet to hook end in middle of bank, and the copper bus bar plates, for each +ve end and -ve end. Shalom |
|
Deleted
Deleted Member
Posts: 0
|
Post by Deleted on Jan 27, 2021 14:05:03 GMT -5
Dillion, I went for the hydraulic 10 tonne crimping tool, thanks for the heads up/
Trying to source 20 copper bolts and with washers and nuts all in copper, for my copper plate bus bar.
Hard to find bolts and nuts in copper?
Shalom
|
|
|
|
Post by Dave on Jan 28, 2021 10:53:38 GMT -5
Vaseline?No one uses Vaseline on their battery terminals except hillbillies and 3rd world countries. Grease collects dust as you said – and grease will dry out and crack – or be rubbed away Every since you posted this – I have looking in my took box for what I used – no luck But it is a product called lock-tite (or something like that) you can buy it at any auto parts store. It sprays an acrylic resin – encases the terminal in a hard block of clear and hard plastic The product hangs in every auto parts store and cost less than $5 It smells and looks just like clear finger nail polish in a small little spray can In the Marine Corps – I was a Mechanic for Tanks and Amtracks (MOS 2141 – 2142) The military paint their battery terminals with acrylic paint – a bucket and a brush Buss bar – you will not find copper bolts, nuts, or plates Most bus bars are a zinc/copper alloy – copper is too soft on its own Instead of trying to make your own – since you have so much invested Why not just do it right To buy one= www.westmarine.com/buy/marinco--650a-pro-installer-heavy-duty-bus-bar-5-stud--14981690?recordNum=9The other suggestion = Find yourself an industrial electrical contractor – they are always large companies I mean companies that would wire an airport – or a skyscraper Why – because they always have trash They always have rooms full of mismatched parts – taken from old jobs – or parted for new jobs You want to buy an old – high voltage junction box – just for the industrial bus bars inside them They might even sell you the part 
|
|
Deleted
Deleted Member
Posts: 0
|
Post by Deleted on Jan 28, 2021 13:57:07 GMT -5
Good advice, thanks Dave. Crimping advice? 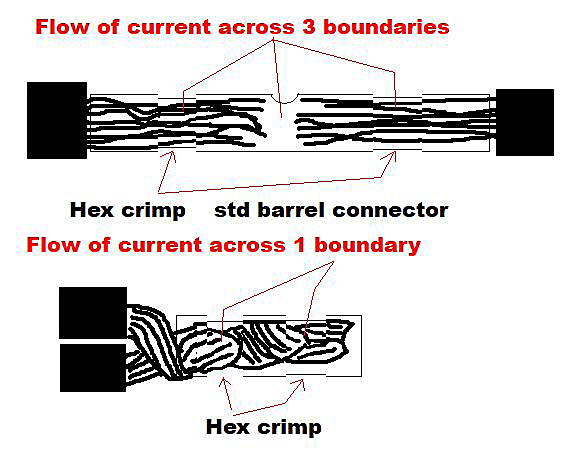 Can't read on better ideas of crimping? Why can’t I find advice on better crimping techniques. This proposal of mine is far better, reduces potential barriers of current from 3 interfaces to one, or none. You twist the wires together as electricians already do, and use the crimp only to hold the connection, not make the connection Shalom |
|
|
|
Post by Dave on Jan 28, 2021 15:04:59 GMT -5
Right way or wrong way People do noy twist or barde their wires before cripmping The secret - regardless of how you do it - is to supply sufficeint force that the copper melds together in a unibody without air pockets. Air pockets provide the O2 that causes the oxidation and corrosion  I beat mine into a pancake with a large hammer and an anvile Attachments:
|
|
Deleted
Deleted Member
Posts: 0
|
Post by Deleted on Jan 29, 2021 14:42:39 GMT -5
Greetings Dave
What you said refers to single wire and single lug???
A single lug, can be beaten to a pancake, and has no air pockets yes.
But I am talking about the barrel end to end connection of two wires. The common standard connector has a dimple in the middle preventing the two wires from touching each other, hence a air pocket by definition exists around the dimple in the barrel connector; see my diagram in the previous post.
The best and only standard way electricians deal with wires carrying big current loads, is to twist the two wires together, and hold it inside a brass barrel with a grub screw. The twisted strands blend into one mass of copper and make the current flow easily over the interfaces, NOT the crimping procedure, which at best has only two crimps allowing a connection for current to flow over.
D" I beat mine into a pancake with a large hammer and an anvil
R do you do this to a single wire going into a single lug?
I am referring to two wires butt end to end joined by a barrel connector? You should twist them together.
Shalom
|
|
|
|
Post by Dave on Jan 29, 2021 18:38:20 GMT -5
D" I beat mine into a pancake with a large hammer and an anvil
R do you do this to a single wire going into a single lug?Depends on – the right parts = the right sized lug for the correct wire Then you place the two or more wires on top of one another – not side by side I bought a 500’ spool of #4 Thnn long ago I use it for everything – except my battery cables I bought a #1 wire jumper cable set – for a large farm tractor or combine ($49.94 at the farm supply store) – I cut it to length and took it into the local electric company and they crimpled the 7/16” end lugs – cost me $3 a crimp I am referring to two wires butt end to end joined by a barrel connector? You should twist them together. Confused – I cannot picture your problem in my headIf you are tying several wires together at a terminal Everyone here would use single islets on a single post If you are tying several wires together on the run – you should use a junction box single islets on a single post – or buss bar application I am thinking of why anyone would ever do - two wires butt end to endEven in the application where you splice off – or branch – you never have thee ends to twist together – you should have one wire with a piece of insulation missing exposing the wire + one but end + one inline splice. – you do this in 12volt automotive land – but never seen it in industrial or solar applications You have so much invested – you should not be twisting any wires – or butting endsMy solar panels have all the nice branch connectors – but in the end it appears you have a butt end – to – butt end connection DON’T DO IT – open the last connector – discard the pigtail – replace it with your wire – put it all back together – now your wire is the last connector (did that make sense) I am not sure I am of use from so far away – but do you know what an American would do?I admit it – I have been educated this way myself You go to a contractor – a professional – and ask them – hey how do you do this In America – 99% of the time – they will sit and talk with you Then send you to their parts department Always the key to long term sucess = correct part or tool for the job Years ago - trying to rewire my mothers house - I wanted to lite the barn from the house But the distance made it seem impossible - unless I spend $600 on large gauge underground wire I went to the local untility company - I ask to the receptionist if I could ask some question from someone. She sent me to an office to see a guy - 5 minutes later he walked me to their parts departmnet and I bought a 110v/240v double pole thriple throw block Never heard of it before and it sent me back $150 - but All I had to do isrun one normal sized underground wire to this block - when the switch is one - it threw the switches that turned on one 110v line and one 240v line If that don’t work – next time offer to hire the contractor – then ask him what he thinks the cheapest or best way to do it – then when he bids the job – I just could not afford their services (it was/ and always is the truth) My X-wife and I built a house on a mountain side in Colorado I say I did it all – that isn’t really true – we hired a guy from church to come excavate Then when it came time to texture the walls – my X-wife insisted we hire a professional I was so frustrated – I spayed popcorn ceilings before – how hard can it be But she insisted – would not take no for an answer – and she hired two guys from town She paid them $400 to spray our house After they were done – she said – I quote, “Even she could have done it!”  The hardest part of any job The hardest part of any job – is the learning curve – my experience  The Birth Place of www.ponderingconfusion.com The Birth Place of www.ponderingconfusion.com
|
|
Deleted
Deleted Member
Posts: 0
|
Post by Deleted on Jan 29, 2021 21:41:49 GMT -5
You write well Dave. Thanks. I checked the voltage on my banks so far, 10 cells each. They are 13.2 Volts each. Not 12.0 Volts as I suspected, or 11.0 volts for discharged cells. Seems like they are all fully charged already? And for the 20 cell bank, the voltage already with be 26.4 volts, almost the float voltage I need at 27.4 volts? The solar wires are standard ones, black with what seems 1mm2 multicore wire inside, but these wires have to be joined many times to each other solar wires in the solar panel array. Hence I was told to crimp the ends. 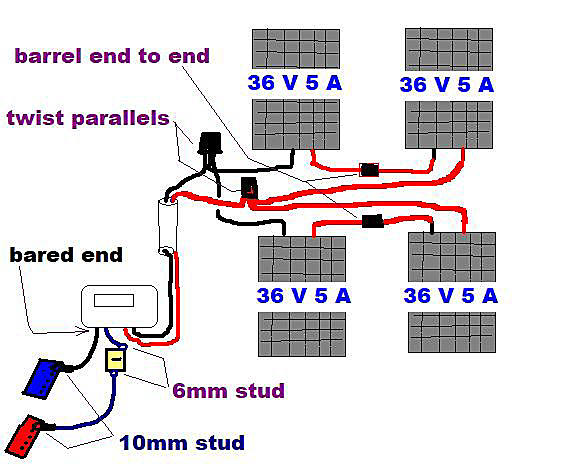 Here is a proposed detailed design of a single of three strings for each of three MPPT solar controllers/ The copper plates begin the journey using M10 brass bolts and lugs that cost me $24 each. The plate cost me $40 each. The positive strand goes to a 6mm stud hole for the resettable fuse. And from there bare ends into the MPPT that has it own internal method of holding each wire connection. The solar array string, is basically two in series and two in parallel, this creates 72V at 10A. Joining the black solar cables together require barrel butt end to end connections crimped together. The parallel connection is the most critical. I plan to twist the three wires together, and place a barrel connector over them, (not end to end) and crimp it together (essentially the same way electricians join wires together and use a BD to place over the twisted ends. ) Since the voltage is so high, critical good crimping should not be so critical. The wires will need to be wrapped in tape and placed in conduit to keep mice off it, and all six wires feed into a single PVC conduit through the roof into the ceiling of the power house. The other 4 wires are not pictured. The diagram shows one string, there are two more others, each with there own MPPT solar controller. Hope this makes sense?? It's been really great looking over your system and us discussing things. I look forward to the day of making my own vertical wind generator like yours.  Shalom |
|
|
|
Post by Dave on Jan 29, 2021 22:30:22 GMT -5
|
|
Deleted
Deleted Member
Posts: 0
|
Post by Deleted on Jan 29, 2021 23:09:05 GMT -5
I see Dave. Thanks.
These are Anderson Connectors and cost money. Lots of money. My older house cost me $500 for the wire, so I wasn't going to pay another 500 for the Anderson connectors.
SO I cut them off the wires and join them as twisted with barrel connections, cheaper this way and more electrically connected and reliable.
Take you middle picture a connector to a three wire connector, making 8 interfaces for the 72V and 10A to move over, with my idea of twisting the three wires together, you have a single interface for the current to flow over. Mine idea is what an electrician would do, more stable and robust, but not easily removed.
Shalom my friend
|
|
|
|
Post by Dave on Jan 30, 2021 5:25:23 GMT -5
500 for the Anderson connectors WOW - things are so expensive in Australia www.amazon.com/s?k=solar+wire+branch&ref=nb_sb_noss BougeRV 44PCS Solar Connector with Spanners IP67 Waterproof Solar Panel Cable Connectors Male/Female 22Pairs $20.99  Generies Y Branch Solar Panel Connectors, 1 to 4 Solar Parallel Adapter Cable Tool Kit for Solar Panel Parallel Connection(M/FFFF and F/MMMM) $14.99  LINKPAL Branch Connectors Connectors Y Connector in Pair MMF+FFM for Parallel Connection Between Solar Panels … (1 Pair) 4.8 out of 5 stars 462 $8.96 |
|
Deleted
Deleted Member
Posts: 0
|
Post by Deleted on Jan 30, 2021 19:02:58 GMT -5
I could only dream of such a low price
Watching USA home renovations too, so cheap compared to Australian home renovations.
Shalom
|
|
|
|
Post by Dave on Jan 30, 2021 19:16:40 GMT -5
Can I get Amazon to deliver to Australia? You can get almost anything on Amazon.com and ship it to Australia through Borderlinx. www.borderlinx.com/AU/enJust saying |
|


