|
|
Post by Dave on Nov 28, 2020 17:37:18 GMT -5
Amazing D - you know I was dreaming of one 5 years ago - but didn't want to spend all my money at once
Total investment in my solar - about $3000
I can always add a Power Wall later - or at least Lithium based batteries
Do you read the Thrifty Nickel?
Are you up for a road trip? We could make a drive of it to Missouri to pick up some used industrail batteries - electric fork lift batteries - if you can carry them - you can have them.
I am always available
|
|
Deleted
Deleted Member
Posts: 0
|
Post by Deleted on Nov 29, 2020 15:21:02 GMT -5
Sounds great Dave, but I am committed now to building a power room, with new batteries and twelve solar panels, allowing 50 to 60 Amps charge. with 4 hours of sunlight, this equates to 200 amp/hr of storage?? theory verses practice?
If I have 2400 watt solar panels, charging 4 hours is 9600 watts, and should 9600/12000= full charge, if I drain them to 20 %. But I have left out efficiencies. So it's hard to know all this stuff until you build it.
My olden way of making connections worked for taking only 1 to 3 amps into each wire, but not going to work for Inverters requiring 40 amps.
I was thinking of getting a 200Amp cable and soldering 4 wires into each, smaller, to handle 40 amps each, or should I solder the 4 wires into a single lug big enough to hold them all? This cable has to be short and thick. And with 40 amp fuses, or 50 amp fuses, since the Inverter requires 40 amps? Can it handle more before blowing up?
Or should I drill 4 holes into a copper rail and bolt each Inverter wire individually, rather than solder all 4 wires into a single lug and bolt this to the rail? Which is best?
I will try a cheap version of what you saying Dave for my aquaculture, will have 4 solar panels, 2 batteries, a 24v 20amp controller and inverter to run a pump several times a day for 3 minutes to add water to my veggies in a hydroponics type trough. The water contains geese pooh. This system will cost me nothing, all left over parts except a cheap inverter.
Shalom |
|
|
|
Post by Dave on Nov 29, 2020 17:56:19 GMT -5
 This is my simple system - see the cabinet door with the voltmeter and 2 knobs That cabinet door is a memorabilia of the past – 1982-1988 – I had a mobile home drug ways back into the woods of Indiana 26 acers of Hard Woods – Oak – Elm – Hickory – Cherry – and a lot of Maple You pulled off the gravel county road into my drive and disappeared behind the trees At the time I built floors for Redman Homes and each bundle of floor decking came banded to three scrap 2x4s – for two years these scrap 2x4s came home with me and I have a 1100 foot (335 meter) board walk through the woods back to my house   |
|
|
|
Post by Dave on Nov 29, 2020 18:11:01 GMT -5
Each photo was suppose to represent 100 paces - to my sister and nephew    And in my cabin in the woods - I powered my 12v home with a 5hp Honda motor and a 100amp Ford pick-up altenator Yes - I was weird way back then too - all my neighbors new who I was |
|
|
|
Post by Dave on Nov 29, 2020 18:24:56 GMT -5
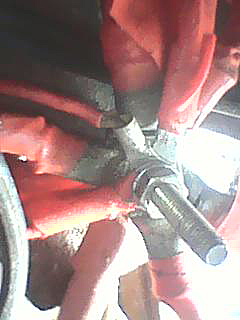
 That cabinet door today - just covers all my wires  I post this for you to see the buss bars I use 300amp at 12v -  Wind comes in top left The gizmoe at the top center - is the DUMP controler - any time the system voltage = 15.6v for more than 90 seconds - the excess is dumpped into a heating element under my water tank Top right are my two charge controllers Both paired with 400watts at 24v incoming Both charge upto 40amps - Both have a 50amp breaker on its output side Do I charge at 80amps all day long - NO My charge comtrollers are mppt - they are smart - they take up to 150v any amperage and convert it into a 12v charge They undertstand my batteries - they do what needs to be done all by them selves BY having 2 - yes I can supply 80 amps at peak - but peak is not the whole day By having 2 - I DOUBLE any charge coming in Better performece in the early am and late pm - but just max out at 80 amps at the peak (if they get enough incoming) Wow you got 10 years out of your batteries? Mine lasted only up to the warranty date, 2 years. I suspect the chemistry life was poor, Chinese quality? You're lucky, yours were made in the USA? What an interesting thing to say – and explains why you want to spend so much D spoke of failed Decka Batteries – I had to check – not China – just Pennsylvania |
|
Deleted
Deleted Member
Posts: 0
|
Post by Deleted on Dec 1, 2020 4:37:22 GMT -5
I really loved the pictures Dave, really really helpful.
I will show you mine in time when I build it.
Frist hold up is getting my Besser blocks, 400x200x200 mm
I wish to build a secure power room 2.8m by 4.0 m
I note you have two charge controllers. Both 40 amp
I will have three charge controllers. All of them 20 amp
That should give me up to 50 to 50 amps of charging.
You have an excess current dump controller, what a great idea.
You also have two inverters that I see.
I will have 4 inverters, all rated at 1000 watt.
Your bus bars are interesting.
I liked the fuse breakers you have there.
Just got lucky purchasing second hand 10yr old 190W 45 volt solar panels, twelve of them for $600, $50 per solar panel.
Instead of getting 5 amps I might get 4 amps, will have to see.
D: "What an interesting thing to say – and explains why you want to spend so much
R Yes, reason why Trump is avoiding everything made in China. Their standards are not high enough, cheap is not always best. I like things made in Germany, the USA and Japan.
Shalom my friend
|
|
|
|
Post by Dave on Dec 1, 2020 11:04:36 GMT -5
Dillon and I had a chat by phone about your solar system This is what was said We have been looking at your picture. Is the exposed wire aluminum? Those connectors all look to be aluminum. The exposed connect is not crimped well. You did not paint your connections. earlybirdelectricians.com/blog/aluminum-wiring-dangerous/#:~:text=When%20aluminum%20wire%20connections%20loosen,and%20more%20fragile%20than%20copper. Is Aluminum Wiring Dangerous? | Early Bird ElectricWhen aluminum wire connections loosen, the metal is exposed to the air. Exposed wiring is prone to oxidation and corrosion, which can further impede electrical flow to outlets. Finally, aluminum wiring is simply less flexible and more fragile than copper. Aug 15, 2019 Aluminum wire is a huge mistake.
1- it oxidizes much quicker than copper
2- it is less malleable on the periodic table
3- meaning it is more brittle
4 – it is cheaperwww.edn.com/bad-crimp-bad-news/ SEPTEMBER 27, 2013 BY MARTIN ROWE Recently, I attended a presentation on connector reliability and what happens when connectors are incorrectly used. J. Duncan Glover, PhD, gave the presentation to the Boston Chapter of the IEEE Reliability Society. Given my recent blogs on how contact resistance can cause heating, and on dishwasher fires, this presentation came at just the right time. Figure 3 shows a cross section of two crimps. The connector on the right was properly crimped. The wires are packed closely together in the connector. The left cross section shows an improper crimp. Spacing between the wires resulted in higher contact resistance, which caused heating, which caused even higher resistance, which caused thermal runaway, and eventually, fire.  Oxidation Oxidation – in a stranded wire – if there is air space between to stands – the oxygen in the air causes electrostatic micro charges that cause pitting of the wire and corrosion (even if not visible to the eye) This is exactly the same phenomena as the battery terminals in your car exposed to the air. 1- bad crimping – allows this to happen in the air pockets 2- exposed wire at the crimp is a no no 3- Aluminum wire will crack and gap inside its insulation over a distance www.paigewire.com/pumpWireCalc.aspx240v 20 amp at 100 feet = 12awg copper but 10awg aliminum Solution – COPPER ONLYCopper connected to Aluminum – will leak and will go bad over time because they do not expand and contract at the same rate Copper is more malleable – meaning less apt to crack or gap in long distances in stranded wire Also – crimping copper to copper smashes together into a single mass Copper is expensive – so I bought a 500 foot roll of black #4 Thwn I have been using the same roll for 22 years now I just spray paint one red (reddish – wears off easy – but you can tell) 10pcs Purple Copper Terminal Lugs 4 AWG Battery Cable Ends Tubular Bare Copper Eyelets Ring Terminal Connectors(4 AWG - 1/4'' Ring) - $12.59 on Amazon.com I bought the correct crimp ends on Amazon I was careful not to over peal the insulation Copper wire – that fit perfectly inside the correct copper crimp end then beat it into a pancake with a big hammer Some of my rings should have been 3/8” – so I just drilled them out I bought shrink wrap tape – but it didn’t work perfectly All of my terminals are painted – with corrosion resistance plastic spray Solar panels work their best at 77*F (25C) D had his lying flat on a black garage roof (5/12 pitch) – but they worked a lot better when he raised them up so they could breath. D also sprays his panels off with the hose I am not the crazy about it – but my panels are on the ground and I do wash away the bird strikes My panels are also on the ground as a wind break for my greenhouse The DUMP controller - everyone who does wind has a dump controller Wind energy is dumpped straight into the batteries If your system is full charge - the wind does not stop - so the excess has to divert to somewhere else to be burnt off Why is the voltage set so hight? - to compensate for wind gust |
|
Deleted
Deleted Member
Posts: 0
|
Post by Deleted on Dec 1, 2020 14:27:15 GMT -5
Nice comments, thanks that both of you care to discuss.
The copper wires are all soldered into each lug.
Is not soldering a better solution than crimping?
And for massive loads of 40amps, and 120 amps, should we not solder the copper wires into each lug?
Thanks for info about dump controller about wind.
Not sure I like crimping, oxidation is a problem in high humidity
and dry socket connections?
Soldering removes all this.
Shalom
|
|
|
|
Post by Dillon on Dec 2, 2020 11:05:34 GMT -5
monroeengineering.com/blog/crimping-vs-soldering-cable-connectors-which-is-best/#:~:text=Crimping%20offers%20stronger%2C%20more%20reliable,is%20also%20easier%20than%20soldering. Crimping vs Soldering Cable Connectors: Which Is Best ...Crimping offers stronger, more reliable connections than soldering. Soldering uses heated metal to join the cable to the connector. Over time, this filler metal will degrade, which may cause the connection to fail. Most electricians will agree that crimping is also easier than soldering.Jun 25, 2019 FYI - soldering is ony routinely used for miliamp circuts (i.e. electronics) The biggest harm to soldered connection is heat Soldering is not advised for large wires at high voltages or amperages
|
|
Deleted
Deleted Member
Posts: 0
|
Post by Deleted on Dec 2, 2020 13:22:40 GMT -5
Right you are Dillion
For cable connections, crimping typically outperforms soldering for a few key reasons. First and foremost, cable connections last longer when they are crimped because they are protected from the intrusion of moisture, dirt and debris. Crimping tools are designed to create an air-tight seal between the cable and the connector. Therefore, moisture, dirt and debris won’t be able to reach the crimped cable. Soldering, unfortunately, doesn’t offer this same level of protection.
Crimping offers stronger, more reliable connections than soldering. Soldering uses heated metal to join the cable to the connector. Over time, this filler metal will degrade, which may cause the connection to fail.
---------
For high currents and thick wires, a gas-tight crimped junction is the industry standard choice.
While solder appears to have its advantages, the key issue to keep in mind is the challenge of soldering 1 AWG copper wire, where the thermal conductivity of the wire itself will rapidly draw heat away from the soldering location, and insulation etc elsewhere on the wire would get overheated and damaged. Of course, for such uses, a blow-torch type gas soldering gun would be used instead of conventional soldering irons, but the issue remains.
Another concern with soldering is that the solder itself could potentially melt and run, leading to an all round mess, if the junction were to heat up enough, a distinct possibility at 160 Amperes.
Screw terminals would work, but the risk is of the terminal tabs coming loose over time due to mechanical vibration, and also of oxide formation at the metal contact surface, leading to increased resistance, thereby heat, and another all-round mess.
A crimped spade terminal actually creates a metal-metal colloidal bond at the surface between the wire and the terminal, and if done right, no gas remains between the surfaces. This ensures longevity and safety, making this the preferred mechanism in industrial implementations
--------
+1 for describing melting solder. Also, solder re-crystallizes with age, and any heat can help this process. Which increases the joint resistance... – Brian Drummond Apr 17 '13 at 10:27
I agree with this answer as the best solution. The problem is that tools to crimp a connector properly can be expensive, so for a one-off, solder may be a better choice than a poor crimp with an inferior tool. – lyndon Apr 17 '13 at 12:29
2
@lyndon Sure: So long as one is comfortable with the risk of a solder melting, then a high power electrical meltdown and possible risk to life, given the 160 Ampere current specified in the requirement. – Anindo Ghosh Apr 17 '13 at 12:32
What about terminals that have screw connections? so you put the wire in and then tighten a set-screw? Are those any good? – Sponge Bob Apr 18 '13 at 3:43
2
@keeganmccarthy I had somehow gathered that was the case. If you actually need to be handling such high currents, it might behoove you to pay someone at some industrial set-up or workshop to crimp you a set of wires. Safety is best not taken lightly when heat generation is proportional to the square of 160 Amperes! – Anindo Ghosh Apr 18 '13 at 3:49
Do you crimp cables yourself, or get professionals to do this?
The bigger ones that carry 40 amps...
Shalom
|
|
|
|
Post by Dillon on Dec 2, 2020 13:51:16 GMT -5
I am not sure what you do for a living Robert, but every job I have ever done always worked best when I had the proper tool for the job Amazon.com LICHAMP Hydraulic Cable Lug Tool, 6 AWG to 4/0 AWG Battery Cable Crimping Tool WIRE Terminal Dieless Crimper Set, 1202BL 5.0 out of 5 stars 1 $49.99 16 Ton Hydraulic Wire Crimping Tool - Battery Cable Lug Terminal Crimper with 11 Sets of Die Pairs, 16mm to 300mm 4.6 out of 5 stars 165 $59.99 IBOSAD 10 Tons Hydraulic Wire Battery Cable Lug Terminal Crimper Crimping Tool 12 AWG to 00 (2/0) Electrical Terminal Wire Crimping Plier Kit,Marked with AWG 4.5 out of 5 stars 207 $39.99 EV West - Heavy Gauge Cable Terminal End Crimping Guide youtu.be/Kl4ZRs7u-BA |
|
Deleted
Deleted Member
Posts: 0
|
Post by Deleted on Dec 2, 2020 13:59:48 GMT -5
Thanks Dillion, you're the best
Enjoy your day
SHalom
|
|
Deleted
Deleted Member
Posts: 0
|
Post by Deleted on Jan 7, 2021 3:08:06 GMT -5
 Hope this image works, a picture of me nearly finishing the new power room for my batteries etc. Will do ceiling and room this week. Have yet to purchase the MPPT, I reckon the Victron 100V 30A seems best, so will purchase three of these, and wire two 36 V 5 Amp panels in series, making 72 V 5Amp, and than wire two of these in parallel, making 72 V and 10 Amps. The MPPT will make this into 27 volt at 26 amps. Using three controllers I should in theory get 70 Amps into my 24 volt system, but it actually charges to 27.4 V, for Ni-Fe 500 AMp Hr Battery bank. These batteries have arrived now, so getting there slowly. Not for faint hearted laying blocks standing on blocks.... Cheers everyone. SHalom |
|
Deleted
Deleted Member
Posts: 0
|
Post by Deleted on Jan 10, 2021 14:17:50 GMT -5
Currently added the roof, ceiling and now cementing the surrounds between roof and top wall to keep rats and mouse out. The room has to be vermin proof. At my other house the mice have eaten my wires away, so I have to remove all my off grid work over there.  Like so, hope the cement work stays there.  Roof done, note the steel supports in place for solar panels, at about 23 degree tilt to north. Attachments:
|
|
Deleted
Deleted Member
Posts: 0
|
Post by Deleted on Jan 17, 2021 4:36:12 GMT -5
The door is finished to power house. 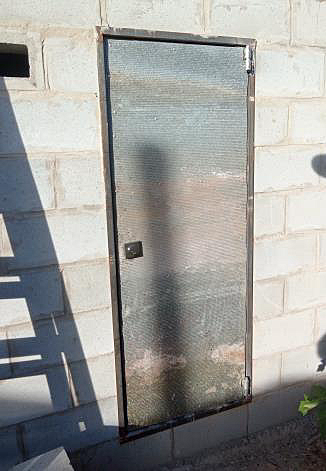 Picture of the door opened. Lots of steel. 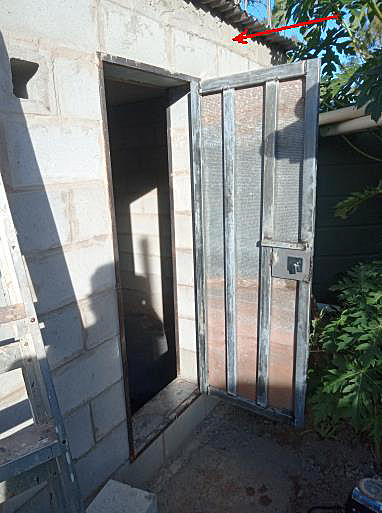 Red arrow shows cement render to rafter/roof to vermin proof the power house. Ready to paint, and weld up battery cage frames. Shalom |
|


